Oh Bruschetta. Whoever initially thought up the idea of bruschetta was on a par, intelligence-wise, with the person who thought to put peanut butter and chocolate together. What can you put bruschetta on, you might ask? The answer is: YES. During a stint with Weight Watchers, I learned that bruschetta can be a fantastic topping for baked potatoes – it’s lower in both fat and calories than my usual sour cream topping. Bruschetta on eggs? Yes. Crostini (maybe with a little parmesan on top)? OH MY YES. It’s just a miraculous and incredibly easy thing to make.
For the first week of my Adventures in CSA, I thought that pairing some of the tomatoes (in bruschetta form) with fresh sustainable (!) sea scallops from the grocery store would do the trick. The answer is: most indubitably YES. This was a massive win, and though I didn’t do the grilling (DH handled that task rather nicely), I ran the kitchen and had the stove happily bubbling.
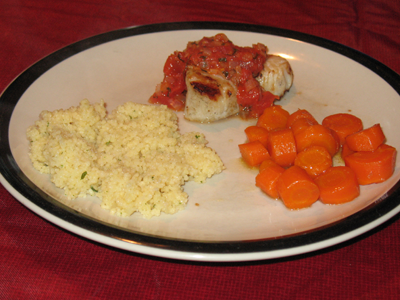
The full dinner that night: Grilled Scallops with Bruschetta, Garlic & Parmesan Couscous, and Glazed Carrots. (Full disclosure: the couscous was the Near East boxed variety…it has high acceptance rates with the kids, but I don’t think adding something boxed diminished the meal in any way.)
Can you make this dish with bay scallops? Probably – although I wouldn’t do them on the grill. Bay scallops are small enough that I’d probably just pan fry them instead. Sea scallops, especially the wild ones that are sustainably fished, can be really nicely sized for the grill.
My instructions below are based on the idea that you’re doing these together – so it’s all about timing to get things done at the same time. If you want to make *just* the bruschetta, figure on about 10 min of prep time to cut everything, and then another 10 min of cooking time.
Serves: 2-3
Prep: 30 min (marinating the scallops); 10 min (chopping for the bruschetta)
Cook time: 8-10 min (scallops); 10 min (bruschetta)
Ingredients: Grilled Scallops
1 lb sea scallops
1/4 cup extra virgin olive oil
2 Tb lemon juice
Ingredients: Bruschetta
1 large slicing tomato, diced
2 medium or large shallots, minced
1-1/2 Tb extra virgin olive oil
2 tsp lemon juice
1 tsp dried parsley
1 tsp dried cilantro
salt and pepper, to taste
Make it Happen
1. Rinse the scallops and place in a mixing bowl; add the olive oil and lemon juice noted above for the scallops. Marinate for 30 mins.
2. When you start the grill, start getting the bruschetta in the pan. Start by heating up the olive oil for the bruschetta in a medium non-stick skillet over medium heat. Add the shallots, and stir to coat them with the oil. Continue to let the shallots go on their own for about 1-2 mins.
3. Add the tomatoes to the pan, stir well to combine. Sprinkle or grind salt and pepper onto the mixture and stir again, only adding a small amount. (I use sea salt and black pepper grinders, and I did just a couple grinds of each.)
4. Get the scallops on the grill. Total scallop cook time should probably be about 8-10 minutes, but definitely check them for doneness before removing them from the grill. You’ll need to turn them half-way through cooking, so figure on turning them around the 4th or 5th minute of cooking.
5. Continue to stir the tomato/shallot mixture, looking to see that the amount of moisture released by the tomatoes will first boil and then start to cook off. Add the lemon juice earmarked for the bruschetta, as well as the parsley and cilantro. Stir to combine.
6. Continue to cook until the scallops are done or until the majority of the excess moisture is gone from the pan. Remove from heat.
7. When the scallops come off the grill, top with bruschetta.
My result looked like this:
The sugar released by the shallots combined with the rich flavor of the CSA tomatoes to make this probably the sweetest bruschetta I’ve ever had. I have made variations on this before, where I added garlic with the shallots, and that adds a nice tang that’s totally worth doing – but we were out of garlic (the horror!!), so I made do. And this definitely worked.


